Tag Archives: Honey

Lilac Wijn

For English click here
Excuses, ik heb je enigszins misleid. Dit bericht gaat eigenlijk over het maken van Lilac Mead en Lilac Honey, in plaats van Lilac Wine.

De reden voor mijn bedrog is dat ik elke keer dat ik langs een lila boom kom, denk aan mijn moeder, onze oude tuin, haar beste vriendin Francis en Jeff Buckley. En lieve Jeff Buckley zong adembenemend goed Lilac Wine, dus als ik over Sering schrijf, kan ik dat alleen maar bedenken en vandaar de misleidende titel.

Het horen van het lied brengt me terug naar een tijd dat ik de hele dag naar hem zou luisteren en elke pauze zou vasthouden. Als je ook een beetje romantisch bent, raad ik aan om de track te spelen terwijl je mijn instructies voor het maken van mede leest. Ik kan niet goed ademen terwijl ik naar Mr Buckley luister (ik schijn met hem mee te ademen) dus vergeef me alsjeblieft als ik zo nu en dan mijn draad verlies …

Laten we eerst wat lila honing opzetten

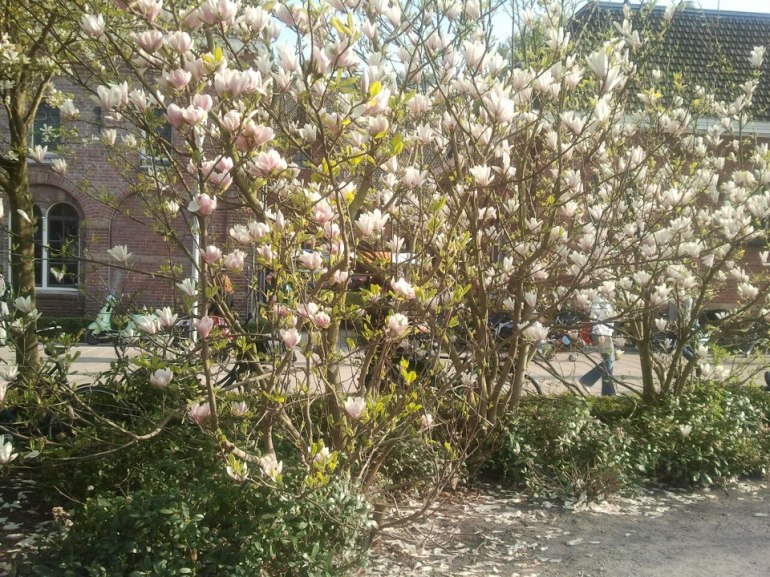
Ja, de bloemen van de Sering struik (Syringa vulgaris) zijn eetbaar. Deze plant komt uit de Olijffamilie (Oleaceae) en je merkt misschien dat de bloemen lijken op die van Liguster (Ligustrum vulgare).

Sering is gemakkelijk te herkennen aan de grote trossen van vierbladige bloemen, elk met een kleine buis, die het verbindt met de bloemclusterstelen en de nectar bevat. Sering bloemtrossen hebben een sterke geur en zijn over het algemeen ongeveer 15-20 cm lang. Volwassen Sering bladeren zijn hartvormig en ongeveer 10 cm lang, terwijl Liguster kleinere bladeren heeft, een kleinere gestalte in het algemeen en veel kleinere witte bloemtrossen.

Liguster wordt vaak wild gevonden en wordt geplant om een dichte haag te maken. Sering wordt soms buiten tuinen gevonden, maar wordt vooral gekweekt vanwege de ongelooflijke bloemen en de aantrekkelijke dikke stelen. Ik klauterde altijd rond en picknickte met slakken in onze oude Lila struik, als kind.

Syringa vulgaris

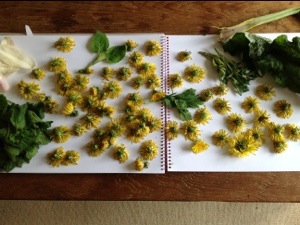
Ja, alle kleuren van Sering bloemen werken hiervoor. De geur is het belangrijkste eigenschap, een beetje kleur is een bonus. Het is het beste om de witte, lila of paarse bloemen te oogsten terwijl ze in topconditie zijn, maar zoals je kunt zien op de afbeeldingen hieronder, gingen sommige van de bloemen die ik vandaag heb geplukt gedeeltelijk over. Maakt niet uit – het is gemakkelijk om de beste onderdelen van de rest te scheiden.

Ik weet niet hoe het met jou zit, maar mijn materialen voor het maken van mede zijn momenteel niet steriel en mijn beperkte kastruimte in het appartement zit boordevol ingeblikt voedsel en gedroogde bonen. Dus terwijl de lila bloemen een week of twee in honing trekken, kan ik een kleine gistingsfles en waterslot vinden en steriliseren en ruimte maken om de fermenterende mede te bewaren. Ik woon in een appartement in Amsterdam, dus er is weinig ruimte en ik brouw in kleine hoeveelheden.

  1. Oogst voorzichtig en legaal 1 of 2 volle sering bloemhoofdjes. Met legaal bedoel ik, gebruik een schaar of snoeischaar en vraag toestemming. Neem maar een beetje. De drie koppen die ik vandaag heb geoogst waren van drie zeer grote sering struiken.
  2. Leg de bloemen, bij voorkeur op een lichtgekleurd oppervlak, tien minuten uit om eventuele insecten aan een plakkerige dood te laten ontsnappen. Scheid vervolgens alle dode of onbetrouwbaar ogende bloemen van de trossen.
De paarse bloemen ruiken nog steeds geweldig, maar sommige bloemen in de tros zijn voorbij hun beste

Kies elke kleine bloem uit de trosstelen. Zorg ervoor dat je de nectary niet op de stelen laat staan, die moet in de honing gaan. De nectary bevindt zich aan het begin van de bloembuis, net waar deze het groen raakt. Knabbelen en je proeft de zoetheid op dat punt van de tube.

De geur die vrijkomt tijdens deze verwerkingsfase is geweldig – als je van de geur van sering houdt.

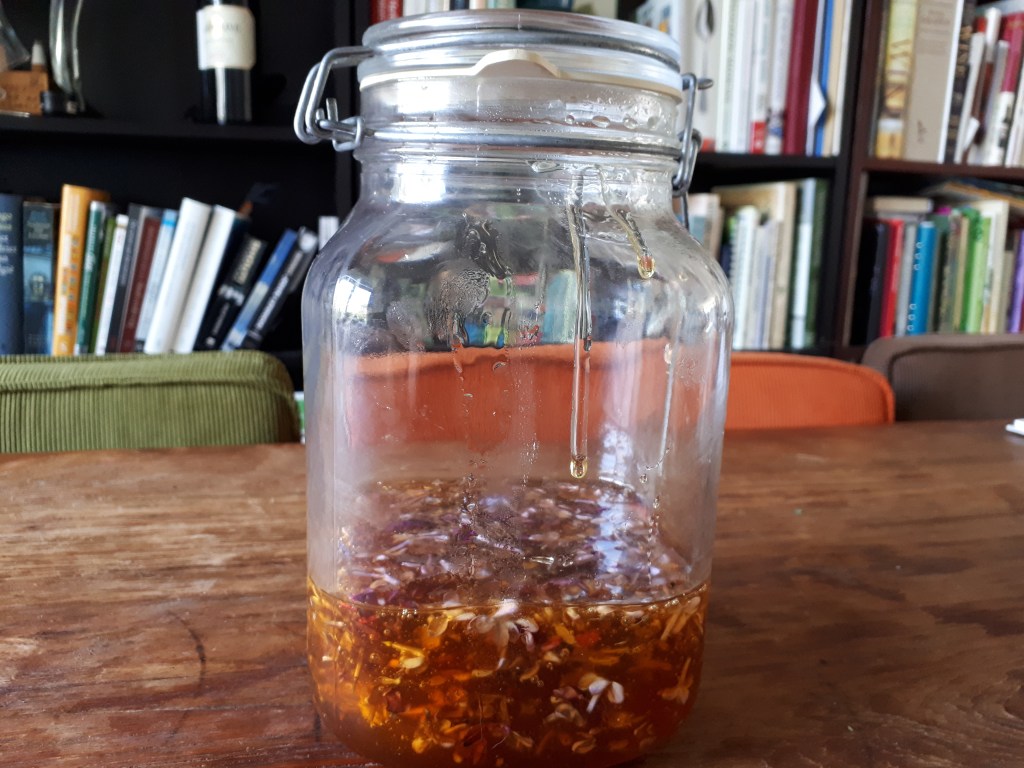
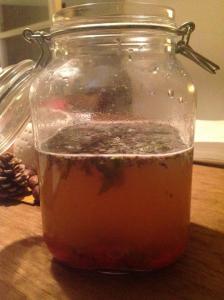
Plaats de afzonderlijk geplukte bloemen in een schone glazen weckpot of jampot. Ik heb vandaag een pot van 2 liter gebruikt en je kunt zien dat er nog veel ruimte over is, wat handig zal zijn als ik over een week of zo water toevoeg.

5. Giet nu voorzichtig ongeveer 500 ml / 2 kopjes vloeibare honing (bij voorkeur lokale honing) over de kleine bloemen en zorg ervoor dat ze volledig bedekt zijn. Zachtjes maar grondig zachtjes om ze in de honing gedrenkt te krijgen. Je hebt zoveel mogelijk contact nodig tussen de honing en de bloemen.

6. Gebruik een schoon, slank, puntig voorwerp, zoals een stok of breinaald, om rond te prikken en eventuele opgesloten luchtbellen uit de mix te verwijderen.

De bloemen zullen naar de top van de honing stijgen als er luchtbellen ontsnappen. Dat is prima. Zorg er gewoon voor dat die bloemen in honing zwemmen en dat je controleert of alle luchtbellen zijn ontsnapt.

Bloemen stijgen op met de kleine luchtbelletjes
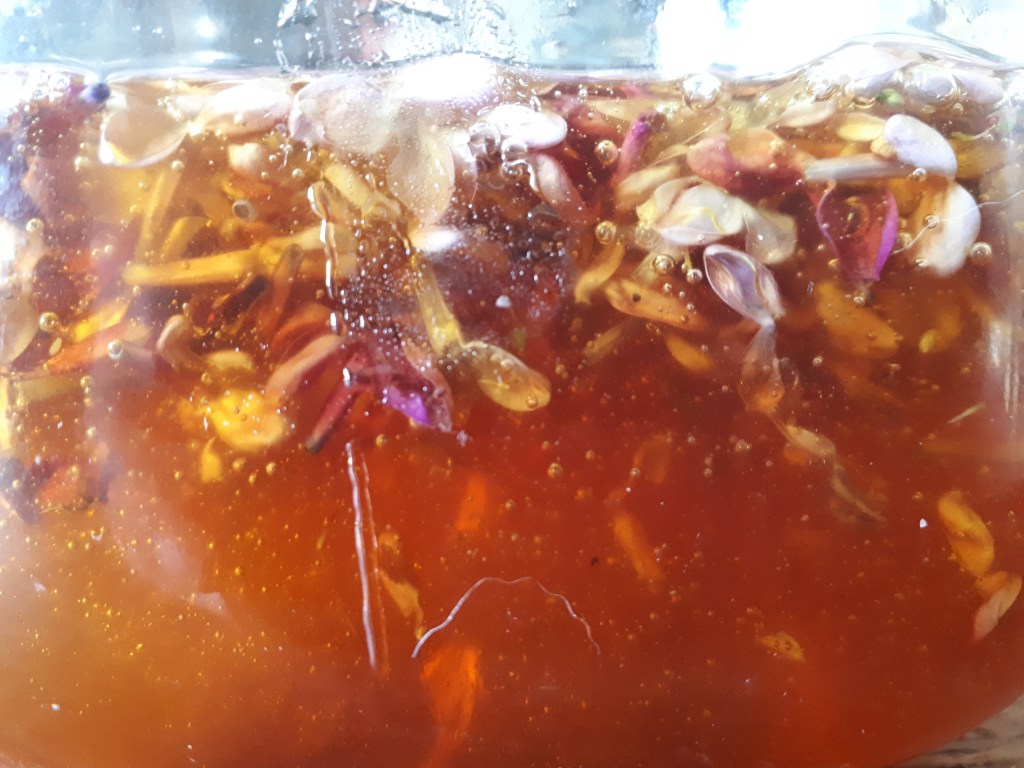
  1. Laat het mengsel intrekken zolang je het kunt verdragen om te wachten. Het basisproces duurt niet lang (een dag), maar naarmate je langer wacht met deze stap, krijg je een veel interessantere mede. Ik vind dat een paar weken voldoende is om een aangename complexiteit van smaak te ontwikkelen in de honinginfusie. Houd gedurende deze tijd, indien mogelijk, dagelijks de infuserende honing in de gaten. Controleer of de bloemen helemaal met honing doordrenkt zijn, vooral tijdens de eerste dagen, anders kun je bruin wordende bloemen vinden – een zeker teken dat zuurstof de bloemen bereikt en rotten mogelijk maakt. Sommige mensen houden ervan om de verzegelde pot een week lang elke dag ondersteboven te houden om het probleem te voorkomen. Ik ben er meer ontspannen over, maar ik zorg er dubbel voor dat er de eerste paar dagen geen lucht in het mengsel achterblijft en dat de bloemen doordrenkt zijn met honing.

NB: Als je alleen de geïnfuseerde honing wilt, zeef dan de bloemen van de honing op dit punt in het proces. Giet het mengsel door een kaasdoek / mousseline. Bewaar de doordrenkte honing in een schone pot en gebruik de gebruikte bloemen in desserts of voeg een theelepel toe per kopje gekookt water voor thee. Anders composteer je ze. Ik bewaar graag wat doordrenkte honing en gebruik de rest voor het volgende mede-recept.

Nu voor het gist!

  1. Voeg na voldoende infusietijd gekookt en vervolgens afgekoeld (tot kamertemperatuur) water toe aan de honingbloemeninfusie. Verschillende culturen staan bekend om het maken van mede van verschillende honing: waterverhoudingen. Hoe hoger de honingconcentratie, hoe hoger het uiteindelijke alcoholgehalte. Ik heb liever een milde mede

Voor deze voeg ik 3x het volume honing toe, in water. Omdat ik ongeveer 500 ml honing heb gebruikt, zal ik ongeveer 1500 ml water toevoegen. Dat zou de pot vullen, dus ik zal er waarschijnlijk iets minder aan toevoegen. Mogelijk hebt u op dit punt een grotere weckpot nodig. Ik hou van de 2-liter exemplaren, omdat ze een behoorlijke hoeveelheid brouwsel kunnen zetten zonder al te veel opslagruimte in beslag te nemen.

  1. Roer nu alles goed door en blaas lucht en natuurlijke gisten de jonge mede in. Gebruik hiervoor een schone lepel. Er zullen natuurlijke gisten zijn over je Sering bloemen, maar deze stap moedigt meer aan en het stimuleert een beter brouwsel.
  2. Bedek de pot met een doek, bijvoorbeeld een schone mousseline en houd deze op zijn plaats met een elastische band rond de rand van de container. Dek het deksel niet volledig af. Het idee is om te voorkomen dat vliegen binnendringen en gisten in de lucht bij het brouwsel te laten komen.
  1. Wacht een week of twee en houd het in de gaten voor microbiële actie. Schuimvorming is hier een goede zaak. Het geeft aan dat gisten in opkomst zijn en de geïnfuseerde honing beginnen te fermenteren, waarbij alcohol en kooldioxide worden geproduceerd. Roer het elke dag goed door, minstens één keer per dag om meer gisten in te rijden. Mede heeft gist nodig!

NB: Als de lokale moerasspirea rond deze tijd in bloei komt, voeg ik een bloemhoofdje van twee toe aan de mix. Moerasspirea bloemen zijn bedekt met lokale gisten en helpen echt bij het fermentatieproces.

Witte schuimende moerasspirea bloemen, van de kruiden van een vorige brouwsel

Gedroogde moerasspirea zal het doen, maar ik hoop dat je het ermee eens bent, het is veel minder Jeff Buckley dan ronddwalen naar een lokale beekrand en een sterk geurende bloei plukken die bekend is bij de druïden en sluwe mensen van weleer en bij sommigen nog steeds bekend om hun plaats in bruidsboeketten en midzomerkronen. Verder gaan…

  1. Ga door met stap 10 totdat u tevreden bent dat er een goede hoeveelheid actie in uw mengsel zit. Als je helemaal geen schuim hebt, bovenop de vloeistof, heb je niet veel gist en krijg je niet veel van een mede. Geef het dus meer tijd.
  2. Als er genoeg opwinding is in uw met stof bedekte weckpot, haalt u de bloemen eraf (en composteert u ze alstublieft). De vloeistof is je onvolgroeide mede. Behandel het vriendelijk. Het heeft nu een gistingsfles nodig met een luchtslot en dat moet een mooi geschrobde en steriele gistingsfles zijn.

Ik gebruik gistingsflessen met een inhoud van 2 liter van de Brouwnarkt.nl. Ze zijn geweldig voor mijn behoeften omdat ze klein genoeg zijn voor mijn appartement en het groen getinte glas voorkomt dat het meeste zonlicht binnenkomt en mijn gisting doodt. Hierdoor kan ik ze op hun beurt uit de kostbare kastruimte houden en op een plank waar ik ze kan volgen (ook bekend als ze elke keer als ik langskom en Lilac wijn voor mezelf zing).

  1. Pas de luchtslot aan zodra de onvolgroeide mede in de gistingsfles zit. Deze moeten meestal voor de helft met water worden gevuld. De rol van de luchtslot is om frisse lucht en insecten buiten de fermentatie te houden en tegelijkertijd bellen van CO2 te laten ontsnappen.
  2. Laat het zo zitten, zonder ermee te roeren of ermee te rommelen, tot het een heldere week niet meer borrelt. Dit kan een paar weken zijn, het kan een paar maanden zijn. Wees geduldig. Goede dingen komen aan degenen die wachten.
  3. Een lange periode van niet-borrelen geeft aan dat de fermentatie is gestopt. Dit kan echter tijdelijk zijn, bijvoorbeeld bij lage temperaturen. Pas dus op dat je niet te opgewonden raakt en te vroeg flesjes maakt, want je zult merken dat hogere temperaturen later in het jaar ervoor zorgen dat het proces opnieuw start. Als dat in uw afgedekte flessen gebeurt, krijgt u waarschijnlijk een puinhoop van lekkende mede en mogelijk enkele exploderende flessen.

Ik heb de neiging om de luchtslot op mijn voltooide mede maandenlang te laten staan. Zolang het luchtslot voor de helft gevuld is met water, kan er niet veel misgaan. Hierdoor kan de mede rijpen.

  1. Ten slotte wordt het afgewerkte deel in flessen gesifoneerd, zoals een sterke glazen Grolsch-fles met drukdop. Hiervoor bewaar ik een meter schone aquariumslang.
zijn ene smaakte erg goed – zelfs na 7 jaar wachten. Elke fles is een verrassing!
  1. Drink onmiddellijk of bewaar om de mede te laten rijpen.

Ik denk dat mede geweldige dingen zijn en ik hoop dat jij het ook leuk vindt. Laat me weten hoe je verder gaat met het recept als je het probeert. En als je van de lila tonen van meneer Buckley houdt, luister dan opnieuw. Misschien is er een lied dat Lilac mede heet? Laat het me weten!


Ik bied een kruidencursus voor diegenen die geïnteresseerd zijn in het gebruik van lokale kruiden en in harmonie met de natuur leven, terwijl ze in de stad zijn. Voor meer informatie, stuur een e-mail of bekijk de informatie hier. De cursus wordt online gehouden met wekelijkse zoombijeenkomsten, 1:1 wandelingen en workshops die opnieuw starten wanneer de corona situatie verbetert. De cursus is beschikbaar in het Nederlands en Engels.

Advertisement

Lilac Wine

Voor Nederlands klik hier

I apologise, I have misled you somewhat. This post is actually about how to make Lilac Mead and Lilac Honey, rather than Lilac Wine.

The reason for my deception is that I think of my mum, our old garden, her best friend Francis and Jeff Buckley, every single time that I pass by a Lilac tree. And dear Jeff Buckley sang Lilac Wine breathtakingly well so as I write about lilac, I can only think of that and hence the misleading title.

Hearing the song transports me back to a time when I would listen to him around the clock and hang on his every pause. If you’re a bit of a romantic too, I suggest playing the track whilst reading through my mead making instructions. I can’t breathe properly whilst listening to Mr Buckley (I seem to breathe along with him) so please forgive me if I lose my thread now and then..

Firstly let’s set up some Lilac honey

Yes, the flowers of the Lilac shrub (Syringa vulgaris) are edible. This plant is in the Olive family (Oleaceae) and you may notice that the flowers are similar to those of Privet (Ligustrum vulgare). Lilac can be easily identified by the large clusters of 4 – petalled flowers, each with a small tube, connecting it to the flower cluster stems, and containing the nectar. Lilac flower clusters are heavily scented and are generally around a 15 – 20cm long.

Mature Lilac leaves are heart shaped and roughly 10cm long whereas Privet has smaller leaves, a smaller stature in general and far smaller white flower clusters. Privet is often found wild and is planted to make a dense hedge. Lilac is sometimes found outside of gardens but is mostly grown for the incredible flowers and the attractive thick stems. I used to scramble around and picnic with snails in our old Lilac shrub, as a child.

Syringa vulgaris

Yes, all colours of Lilac flowers will work for this. The scent is the most important aspect, any colour is a bonus. It’s best to harvest the white, lilac or purple blooms whilst they are in tip top condition but as you will see from the images below, some of the blooms which I picked today were partly going over. No matter – it is easy to separate the best parts from the rest.

I don’t know about you but my mead making materials are not sterile at the moment and my limited apartment cupboard space is chock full of canned foods and dried beans. So, whilst the lilac flowers infuse in honey for a week or two, I can find and sterilise a small demijohn and air lock and make some space to keep the fermenting mead. I live in an Amsterdam apartment so space is at a premium and I brew in small batches.

1. Carefully and legally harvest 1 or 2 full lilac flower heads. By legally, I mean, use scissors or secateurs and ask permission. Only take a little. The three heads that I harvested today were from three very large Lilac shrubs.

2. Lay out the blooms, preferably on a bright surface, for ten minutes to encourage any bugs to escape a sticky death. Then separate any dead or dodgy looking flowers from the clusters.

The purple flowers still smell great but some of the flowers within the cluster are past their best

3. Pick each tiny flower from the cluster stems. Be sure not to leave the nectary on the stems, that needs to go into the honey. The nectary is at the start of the flower tube, just where it meets the green. Have a nibble and you will taste the sweetness at that point of the tube.

The smell released from this processing stage is great – If you like the scent of lilac.

4. Place the individually plucked flowers in a clean glass canning jar or jam jar. I used a 2 litre jar today and you can see there is loads of space remaining which will be useful when I add water in a week or so.

5. Now gently pour about 500ml / 2 cups of runny honey (preferably local honey) over the tiny flowers and ensure that they are totally covered. Gentle but thoroughly ease them around to get them soaked in the honey. You need as much contact between the honey and flowers as possible.

6. Use a clean slender pointy object, such as a chop stick or knitting needle, to poke around and release any trapped air bubbles from the mix.

The flowers will rise to the top of the honey as air bubbles escape. That’s fine. Just ensure that those flowers are swimming in honey and that you check that all of the air bubbles have escaped.

Flowers rise with the tiny air bubbles

7. Leave the mixture to infuse for as long as you can bear to wait. The basic process won’t take very long (a day) but you’ll get a far more interesting mead the longer you wait with this step. I find that a couple of weeks is sufficient to develop a pleasant complexity of flavour in the honey infusion. During this time, keep an eye on the infusing honey daily, if possible. Check that the flowers are totally honey drenched, especially during the first days, or else you may find browning flowers – a sure sign that oxygen is reaching the flowers enabling rotting. Some people like to tip the sealed jar upside down each day for a week, to prevent the problem. I am more relaxed about it but I make double certain that during the first couple of days, there is no air remaining in the mixture and the flowers are drenched in honey.

NB: If you just want the infused honey, strain the flowers from the honey at this stage. Pour the mixture through a cheese cloth / muslin. Save the infused honey in a clean jar and use the spent flowers in deserts or add a teaspoon per a cup of boiled water for teas. Otherwise, compost them. I like to save some infused honey, without straining and to use the rest for the following mead recipe.

Now the yeasty bit!

8. After sufficient infusion time, add boiled and then cooled (to room temperature) water to the honey flower infusion. Different cultures are known for making mead of different honey:water ratios. The higher the honey concentration, the higher the eventual alcohol content. I prefer a mild mead

For this one I’m adding 3x the volume of honey, in water. As I used about 500ml honey, I will add about 1500ml water. That would fill the jar, so I will probably add a little less. You may need a bigger canning jar at this stage. I do like the 2 litre ones as they will make a decent amount of brew without taking too much storage space.

9. Now give it all a good stir, driving air and natural yeasts into the fledgling mead. Use a clean spoon for this. There will be natural yeasts all over your Lilac flowers but this step encourages in more and it encourages a better brew.

10. Cover the jar with cloth, something such as a clean muslin and hold it in place with an elastic band around the rim of the container. Do not fully cover with the lid. The idea is to prevent flies getting in whilst allowing airborne yeasts to get to the brew.

A light froth, on top of the ferment indicates yeast action

11. Leave for a week or two and keep an eye on it for any microbial action. Frothiness is a good thing here. It indicates that yeasts are taking hold and are starting to ferment the infused honey, producing alcohol and carbon dioxide. Give it a good stir everyday, at least once daily to drive in more yeasts. Mead needs yeast!

NB: If the local Meadowsweet comes into flower around this time, I will add a flower head of two into the mix. Meadowsweet flowers are covered in local yeasts and really help the fermentation process along.

White frothy Meadowsweet flowers, from the herbs of a previous batch of mead

Dried Meadowsweet will do but I hope you’ll agree, it is far less Jeff Buckley than wandering along to a local stream edge and plucking a heavily fragrant bloom known to the druids and cunning folk of old and still known to some for it’s place in bridal bouquets and midsummer headdresses. Moving on…

12. Keep doing step 10 until you are satisfied that there is a good amount of action in your mixture. If you don’t have any froth at all, on top of the liquid, you don’t have many yeast and you won’t get much of a mead. So give it more time.

13. When there is plenty of excitement in your cloth covered canning jar, strain off the flowers (and please compost them). The liquid is your immature mead. Treat it kindly. It now needs a container with an air lock and that needs to be a nicely scrubbed and sterile container.

I use 2 litre capacity demijohns from de Brouwnarkt.nl. They are great for my needs as they are small enough for my apartment and the green tinted glass stops most sunlight getting in and killing my ferment. This in turn allows me to keep them out of precious cupboard space and on a shelf where I can monitor them (aka covet them every time I pass by and sing lilac wine to myself).

14. As soon as the immature mead is in the demi-john, fit the airlock. These usually need to be half filled with water. The role of the airlock is to keep fresh air and bugs out of the ferment whilst allowing bubbles of CO2 to escape.

15. Let it sit like that, without agitating or fiddling with it, until it stops bubbling for a clear week. This could be a few weeks, it could be a few months. Be patient. Good things come to those who wait.

16. A long period of non-bubbling indicates that fermentation has ceased. However, this could be temporary, in cold temperatures for instance. So be careful not to get over excited and bottle too soon as you may find that increased temperatures later in the year, cause the process to start up again. If that happens in your capped bottles, you will probably get a mess of leaking mead and possibly some exploding bottles.

I tend to leave the air lock on my finished mead for months. As long as the air lock is half filled with water, not much can go wrong. This allows allows the mead to mature.

17. Finally siphon off the finished mead (I keep a meter length of clean aquarium tubing for this purpose) into bottles such as a strong glass Grolsch bottle with pressure cap.

This one tasted really good – even after 7 years of waiting. Every bottle is a surprise!

18. Drink immediately or store to allow the mead to mature.

I think mead is amazing stuff and I hope you like it too. Do let me know how you get on with the recipe if you try it. And if you like Mr Buckley’s lilac tones, listen again. Perhaps there is a song out there called lilac mead? If so, do let me know!


I offer an apprenticeship course for those interested in using local herbs and living in tune with nature, whilst in the city. For more information, email me or see the information here. The course runs online with weekly Zoom gatherings, 1:1 walks and workshops restarting when the COVID situation improves.

Urban Dandelion and Burdock

Europe is awash with roaring Dandelions at the moment. They are standing proud and showing their wooly faces in parks, along roadsides, in fields and hedgerows. They also grow happily on my roof (and from there I harvest its leaves and roots) .

I love the taste of Dandelion and Burdock syrup, especially when mixed with water and drunk in the summer sunshine. Not many flavours remind me so fondly of my English childhood. But to make Dandelion and Burdock syrup, the roots of Burdock and leaves of Dandelion should be collected and boiled up with sugar water. I don’t use using sugar unless there is no other option and I don’t dig up Burdock roots. Roots tend to concentrate toxins, they are tough to dig up, fellow park visitors may pounce on me and tell me to stop and most of all, I’d like the plants to grow to maturity so that I may harvest the seeds and leaves.

Regarding the Dandelion leaves, I don’t ever harvest them in quantity from Amsterdam public spaces. They live on the plants for a long time, they get walked on and everything else you may like to think of happens on them, whereas the flowers are far more transient. I can more easily see if they are dirty, they only stay on the plant for a short time so are less open to pollution and I just love the sight of them in a jar of honey! Having said this, harvesting herbs from ground level in public spaces is always a bit of a risk, pollution is everywhere. But with syrups, a small amount is consumed in one go, the use of honey kills many bugs naturally and I feel that the benefits far outweigh the concerns. But that’s just me perhaps!

My version of Dandelion and Burdock simply requires honey, 20-30 fresh Dandelion flowers and a small Burdock leaf. That’s all. It has all the medicinal properties that Dandelion and Burdock plants offer, it is quick to make, tastes deliciously bitter-sweet and it keeps well.

20130510-164455.jpg

How to make Urban Dandelion and Burdock Syrup

1. Harvest 20-30 clean, fresh and lively Dandelion heads from a clean area.
Harvest one young, equally vibrant Burdock leaf from a super-healthy looking plant.

2. Place your harvest on a clean white surface for about an hour, to allow any resident bugs time to crawl away.

3. Tear up the Burdock leaf and layer dandelion heads and burdock leaf in a medium sized (250ml) jam jar.

4. As you layer the herb, carefully spoon in runny honey. Poke around a little with a clean chopstick so that air bubbles are released.

5. Continue to layer herb, spoon in honey and prod with the chopstick until the jar is full.

6. Check for obvious air bubbles and prod some more. Top up with honey (right to the lid) and secure with a well fitting lid.

20130510-164708.jpg

7. Leave to stand and infuse for at least three days.

8. Use as it is, as a toast spread or strain (or not) and use as a syrup base for refreshing summer drinks.

Bitter-sweet yum! It taste’s of the English summers of my childhood. We’ll try it on the Pluck Your Lunch! forage this Sunday

Throat lozenges are child’s play

A perfect herbal activity for a drizzly morning when you have to stay inside for some reason – making Honey and Slippery Elm Throat Lozenges! My daughter and I, really love eating these first thing in the morning, or at any time when we have signs of a cold, sore throat or any other excuse.

Here she is, happily making her own lozenges. Not sure if it was the end result she was most happy about, or being able to eat the mixture…

We covered this recipe during the Herbs and Honey Workshop in August. They are super-simple to make. You’ll need to obtain slippery elm powder (Ulmus fulva) from a herbal supplier. I beleive that Jacob Hooy sell it in town, otherwise it can be ordered online. Or if you are desperate for just a cup or it and you live in Amsterdam, I’ll sell you some of my stock. Slippery Elm is a useful food supplement which is very soothing to the intestines and can be made into a nourishing and easily digested gruel, especially good for those recovering from illness. I often add a heaped teaspoon of the powder to my porridge in the morning.

Here’s a brief method of how to make
Honey and Slippery Elm Throat Lozenges

1. Place 1 cup Slippery Elm powder in a large mixing bowl and if desired, add a teaspoon of extra herb powders (marshmallow root and horehound are my favorites) or of licquorice tincture, to enhance the throat soothing action.
2. Use a wooden spoon or spatula to work in about 6 dripping tablespoons of good quality runny honey. You are looking for a very thick paste/dough consistency. It’s easier to add more honey to get this right, than to add more powder if you make it too runny at first.
3. Roll out the dough on a Slippery Elm powdered surface.
4. Cut the dough into tiny shapes or roll it into fine sausages and then nip off small lozenge shapes or the dough. I like to make tiny pyramids from the dough, my daughter prefers the shapes.
5. Place in an airtight container and toss them in a little more slippery elm powder, to prevent them sticking together.
6. Store in the container, in a cool and dry place for up to ten years. They are unlikely to remain uneaten for that long.

Magnolia Petals: Pickles, Honey and more

Magnolia is a tree which I fall in love with again, every year. Everything about it enthralls me. From the graceful angles of the branches, the bark, exotic blooms to the glossy evergreen leaves. A huge magnolia in bloom is a show stopper. One such tree arches quietly over the terrace behind Huize Frankendael, in Amsterdam east. Hundreds of visitors must walk beneath it without giving the tree much thought, until in March or April it explodes into bloom. There is no other tree that I would rather sit beneath and gaze up through than that magnificent magnolia in spring!

FB_IMG_15516484401208236.jpg

Edible and Medicinal Magnolia Petals
The flowers of Magnolia trees are edible and medicinal. In Traditional Chinese Medicine, Magnolia flowers are known as Xin yi hua and are associated with the lung and stomach meridians. I enjoy eating them fresh plucked each year and happily report that they taste fragrant and spicy. I can also report that when I eat Magnolia petal, my sinuses become clear, quite like magic.

Imagine a slightly rubbery super sized rose petal which clears the sinuses a little, when you bite into it and you are getting close to the mouth feel and flavour of a magnolia petal. I like them very much and because a little goes a long way with these large petals, I can certainly recommend them to other urban herb lovers. As you may know, via my Apprenticeship and walks, I teach how to harvest interesting herbs in towns and cities, in a safe and ethical way. This entails taking only a little, leaving no trace and really make the most of the harvest. Do contact me if you would like to know more – This is my passion!

Medicinal Bark
Fairly recent research suggests that Magnolia bark extract can help with oral health, stress reduction and several other disorders. In traditional medicine it is reportedly used as an antibacterial, anti-inflammatory, anticancer agent, in the treatment of Alzheimer disease, depression, diabetes, and menopause. All Magnolia species varieties are considered to possess the same medicinal qualities and there are apparently no known side effects – although we know that someone somewhere, could be allergic to the plant, so please be cautious. Magnolia Bark Extract is widely available for sale and Magnolia bark is an ingredient in many traditional Chinese medicines including Hsiao-cheng-chi-tang, Wuu-Ji-San, Heii-san, Shimpi-to, Hangekouboku-to, Masinin-gan, Sai-boku-to, Syosaiko-to, Irei-to and Goshaku-san.

Japanese traditional medicine also prizes both the bark and flowers of Magnolia. Bark harvesting is not something suggested for the urban forager because it certainly leaves a trace and it is certainly not ethical.

magnolia-westerpark-liberation-day-2013
Magnolias in Westerpark

Stealthy Petal Plucking
When harvesting from perhaps the most beautiful of city trees, one would perhaps look both foolish and anti-social to pluck entire flowers. So I suggest that you don’t. Instead, I recommend that when stumbling upon a prime Magnolia specimen in bloom, and feeling the urge to eat it, you do the following:

1. After checking for unwanted observers, wander nonchalantly up to the tree. Are the blossoms within your reach? If not move on to another.
2. If so, reach up as if to smell the fragrance of a prime bloom, pull it gently to your nose with one hand, whilst deftly plucking a single petal from its base, with the other hand whilst simultaneously inhaling the spicy aroma.
3. Tuck the plucked petal in your pocket as you gently release the bloom with your other hand.
4. Move along to another flower, as if to compare its scent with the previous bloom. Repeat steps 1 to 3 until you have harvested three or four petals.

A magnolia flower can miss one petal without much issue. If two or more petals are plucked from one bloom, evidence of foraging shows and that is not the plan. So one petal from a flower, move to another, one more petal and so on. When you have three or four petals, you are done. That is enough to make something very tasty and useful and you will have increased your stealth foraging skills..

Magnolia flower
Untouched – Delicious

Favourite Trees
I tend to forage a handful of petals each year, from 6 favourite Magnolias which are dotted around east Amsterdam. They are all growing in public spaces so stealth foraging is required. I don’t harvest from them if other people are around because apart from it just looks silly. I also limit myself to plucking a petal from two flowers per tree. I first wrote about my love of Magnolia petals on 2012. Since then urban foraging has increased in popularity so I also am careful to only pluck from Magnolias which seem not to have been visited by other foragers.


Magnolia Petal Recipes
Things that I like to do with a precious handful of magnolia petals. I hope that you have a go and let me know how you get on in the comments.

Magnolia Petal Pickle
They can be pickled, old English style by simply filling a small jar with fresh petals and then completely filling the jar again with rice wine vinegar or apple cider vinegar with a little salt and sugar to balance the flavours. I don’t add sugar or salt so I guess my version is simply Magnolia petal vinegar – I don’t mind because it tastes good 🙂

Fermented Magnolia Petals
You may like to ferment them using a little salt and water, in the style of Sandor Katz.
I prefer to lay them in my handy small Japanese vegetable press. I then sprinkle with a pinch of salt and apply the gentle but consistent pressure of the Japanese press for about 3 hours. This produces a very light ferment and it draws out some of the water from the petals (which tastes good too). You can leave the pressure for a lot longer if you prefer, winding the contraption every few hours to ensure the petals are in fact under a little pressure and to encourage the process.

Magnolia Petal Honey
When I first tasted a Magnolia petal and felt its clearing effect on my sinuses, I decided to transfer the petals’ properties to honey. This is soooo simple to make. It creates something which my family and friends find delicious and I hope you will too. If the honey turns you off, try Agave syrup. It works very well but in my experience is less spreadable (being rather runny).

magnolia honey
Magnolia petals infusing in honey

How to Make Magnolia Petal Honey (or use Agave syrup)
1. Gather your petals.
2. I rarely wash magnolia petals because I only harvest clean looking ones, which are from way above the ground but unsoiled by birds. You may like to wash yours. If so, then dry them off.
3. Tear the clean, surface dry petals into a sterile small glass jar. I use dishwasher cleaned pesto jars for this sort of thing.
4. Covered completely with runny honey. Use a chop stick or knitting needle to loosen trapped air bubbles. You may need to release the air and top up with honey several times. The jar should be filled to the brim with honey. The air bubbles won’t all leave the honey but prodding with chopsticks, helps them to escape and thus reduces the risk of contamination.
5. When no more air bubbles are escaping and no more honey needs to be added, close the jar tightly with its lid.
6. The constituents of the petals will infuse into the honey over the following days and weeks but the honey will take on a delicious Magnolia aroma and taste within a few hours.
7. Eat in any honey way (smear on bread, add to smoothies, mix with a little vinegar for an elixir, etc) you choose or take a teaspoon now and them to help soothe anxiety, sore throats or respiratory congestion. I don’t bother to strain this honey as I like the petal crunch. You could strain after 6 weeks if you preferred. It seems a waste of those petals though.

Please note that the herbal honey may start to ferment after a while, due to the high water content in the petals. Keep an eye on the jar, if it starts to bubble, the lid must be loosened to avoid pressure building up and the glass jar exploding. Storing it in a cool dark location will help to preserve its shelf life. Eating it all up will also avoid the problem 🙂


I hope that you get a taste for Magnolia petals this year and have a try at infusing them in honey, agave syrup, vinegar, vodka or olive oil. This herb is so beautiful, so giving and so tasty – it would be a pity to miss the fun completely wouldn’t it? I was looking at my favourite Magnolia at twilight this evening. It will open its blooms very soon and I will be waiting and thanking it for every petal.


Do you like it?
Please do add a comment about your magnolia experiences at the foot of the page or fill in the contact form. I would love to hear how you get on with magnolia and what else you are keen to learn about!


Urban Herbology Online Apprenticeship
If you want to learn more about foraging and using herbs in towns and cities, take a look at my Apprenticeship Course. I have helped hundreds of wonderful people learn about Urban Herbology over the years and I would love to help you on your journey!

Indian Day Dreams

I was day dreaming about being in India this afternoon and rustled up a really tasty drink which helped to transport me back to Mysore. It cleaned the cobwebs from my mind and got me back on my Yoga mat.  You may like to try it…

Lynn’s Ginger Pineapple Cobweb Cleaning Lassi
1 cup Goat’s Yoghurt
4 Pineapple slices (fresh or canned in pure juice)
1 teaspoon honey
1 teaspoon dried or 1/2 teaspoon fresh grated ginger

Adjust the quantities to suit your taste buds and mental cobwebs.

Simply blend all the ingredients together and drink!
I’m afraid the photo is not mine as my lassi tasted so good I drank it all before I could reach for my camera.

Lassi is a traditional yoghurt based drink from India, there are lots of variations.  If you request lassi in a restaurant you will be asked if you’d like it “sweet or salty”. My version is definitely sweet and the ginger gives it quite a kick.  Have a look at the Wiki Lassi page for more inspiration.

Cough Syrup

This cough syrup recipe was kindly sent to me by Louise from Thornbury, South Glocestershire, UK.  She has been making it since attending a herbal remedies course in Bristol a few years ago. The recipe is taken from Hedley & Shaw’s book, Herbal Remedies: A practical beginner’s guide to making effective remedies in the kitchen

Louise says that… “It’s really good stuff and clears a heavy cold in a matter of days.  I always keep a bottle handy in the fridge and it keeps for ages.  I have even given some to colleagues in work.”

The combination of herbs is said to be soothing, antiseptic, antibiotic and expectorant.  The aim of the syrup is to thin out mucus and help open up the bronchi.  It is recommended by Hedley & Shaw to help relieve deep restless chesty coughs, tightness from colds and sore throats.

I made a batch this week, it tastes wonderful. There are several ingredients but all are easy to obtain and the method is really quite simple.  Some of the ingredients contain strong volatile oils so this syrup should be taken in small quantities for a short period of time and should not be used by pregnant women.

Sterilising storage bottles

Remember that your storage bottles need to be sterile, to prevent contamination and prolong the life of your potion.  This is best done just before you set to work with the herbs as if left until the last minute there may no time to do it properly.

  1. Clean the bottles/jars thoroughly with hot soapy water and a bottle brush,
  2. Let them drip dry
  3. Sterilise them (with lids/caps off and the openings facing upwards) in a warm oven (about 110 oC) for about 10 minutes.   Beware that plastic caps or lid liners will melt and burn if left in too long.
  4. Turn off the oven and leave them in there whilst you make the potion and get ready to pour.  If you need to leave them waiting in the oven for a long while, loosely fit the caps/lids when cool enough to handle, to prevent contaminants getting in.Some people find that cleaning them on a hot dishwasher cycle also does the trick.

Cough Syrup
(Makes approximately 350ml)
Not suitable in pregnancy or for babies

Ingredients
15g dried thyme (NL: Tijm)
8g dried sage (salie)
8g dried chamomile (kamille)
2 teaspoons fennel seeds (venkelzaad)
1 teaspoon aniseed (anijs)
20 cloves (nagelkruiden)
2 garlic cloves (knoflook teentjes)
Pinch cayenne pepper (cayenne) or ground ginger (gember)
900ml water
450g locally sourced honey

Method

  1. Put water and chopped herbs into a pan and bring to the boil.  Cover with a tightly fitting lid.
  2. Turn down the heat and simmer for 20 minutes.
  3. Cool a little, strain through a fine mesh seive, pressing with a clean wooden spoon to extract the goodness.
  4. Discard the herb and keep the liquid.
  5. Return to the heat and simmer slowly, uncovered until reduced to 200ml (making a decoction).
  6. Add 450g honey, dissolve and simmer for a few minutes, stirring all the time, until of a syrupy consistency.
    DO NOT OVERHEAT as the syrup will burn.
  7. Cool a little before pouring into sterilised bottles.
  8. Label (date made and contents) and keep refrigerated to avoid fermentation.
    Best kept in a corked dark glass bottle, as a screw topped bottle may explode if fermentation takes place.

    Legal Disclaimer: The content of this website is not intended to replace conventional western medical treatment. Any suggestions made and all herbs listed are not intended to diagnose, treat,cure or prevent any disease, condition or symptom. Personal directions and use should be provided by a medical herbalist or other qualified health care practitioner with a specific formula for you. All material on this website is provided for general information purposes only and should not be considered medical advice or consultation. Always check with your personal physician when you have a question pertaining to your health and health care.